This game turned out to be a fair result as both teams had chances to score more than the one goal a piece. Both managers threw very few surprises in to the mix as tactically this was a very plain game.
Equals
Villa more defintion between defence and attack. Blackpool more of a blended approach.
From a formation point of view this was 4-2-3-1 v 4-2-3-1, however, they were applied slightly differently as Gerard Houllier prefers to have his two midfielders sit deeper and hold their positions. On the other hand Ian Holloway likes a balance of defence and attack from his two with David Vaughan more likely to sit and hold. A flex in the Aston Villa side was the movement of Ashley Young and Gabriel Agbonlahor, which sometimes gave them the look of a 4-4-1-1. The latter was deployed out left, but would make runs wide and inside and Young would often move to support Darren Bent in attack. Finally, Kyle Walker was given permission to attack and he did so at speed, however, at times his runs would be on the inside and he ran in to the more congested central areas.
Start up
The first half saw both team have chances, Villa looking to counter and using Stuart Downing to great effect on the right cutting in on to his left. However, the Villa goal was a familiar sight for Blackpool fans as the Blackpool defence was caught out of position whilst the game was in transition. A good link up between Bent and Agbonlahor exploited the vacant right back area after Alex Baptiste had been high up the pitch involved in an attack.
The second half saw both teams get in to good attacking positions, however, Blackpool were the team that retained the better possession and created the most chances. Blackpool seemed to hesitate in making decisions in the final third and often looked unsure of what to do and their shooting seemed to reflect that (the goal being the only time they hit the target). After a red card saw Jean Makoun depart Villa switch to a 4-4-1 looking to hit Blackpool on the break, but in truth, both centre back partnerships looked very solid indeed.
Grandin then out
Whilst Blackpool had Elliot Grandin on the pitch they looked more fluid going forward, this in part may have been something to do with his efficiency with the ball, misplacing only one pass before his injury. Jason Puncheon came on to play that role before Andy Reid came on and in to the role on 72 minutes. The chalkboards below show how Grandin performed in the role much better than Puncheon.
Puncheon in the midfield, before being moved wide left.
Stubborn
Gerard Houllier persisted in playing to holding midfielders, however, the chalkboard below showed how only one of them (Reo-Coker) was effective, leaving questions over having Jean Makoun on the field at the same time, where a more attack minded midfielder might have given Villa more options in the final third. You can see how Makoun only won 4 of his 15 duels whilst Reo-Coker won 10 of his 15.
Two holding midfielders really necessary?
All about the centre backs
After both goals were scored the game was characterised by Ian Evatt and Richard Dunne dominating the game and helping to snuff out the attacks. See their chalkboards below. Evatt lost only one duel all afternoon, whilst Dunne lost only 2 of 9 and those that he lost were outside of any danger zone.
Big strong centre backs gave the strikers little change.
Moving on
The result was fair for both teams, Houllier might look at changing his approach in making one of his holding midfielders more progressive and the substition of Michael Bradley might offer him that in the coming weeks. Ian Holloway will be happy to move on to the next game with plenty of time to train up his side and get them motivated for the Spurs game on the 22nd February.
An all-action eight goal thriller. Blackpool continue to provide more bang than their buck in the entertainment stakes, but it’s hard not to yearn for a scrappy 1-0 win. ‘Pool slid to their fifth consecutive defeat at Goodison Park and while Ian Holloway’s men continue to rack up the goals, a defence leakier than the Welsh national emblem means survival is starting to look trickier by the week. The Seasiders bounced back from poor first half performance to take a stunning 3-2 lead, only to collapse under the weight of endless Everton pressure.
Blackpool endured a tough opening 45 minutes and were highly fortunate to go in at half-time with the scores level at 1-1. Everton were rightly furious at the decision to blow for a foul on Seamus Coleman just before half-time, seconds before Louis Saha went on to bag what should have been his second goal of the game. Tangerine Dreaming has identified Marouane Fellaini’s impact in stifling ‘Pool’s midfield in the first half, in particular Charlie Adam.
What else caused the Seasiders to struggle though? The chalkboard below compares the number of successful passes in the first half at Goodison Park against those made in the previous match versus West Ham.
By all accounts it was hardly a scintillating first half against the Hammers last week, but the number of successful passes still dwarves the figure from Saturday’s game. ‘Pool only completed 114 passes in the opening 45 minutes, a startlingly low figure. A failure to hold onto the ball and make it work for them handed the initiative to the Toffees who exploited Blackpool’s defensive frailties on numerous occasions.
Nowhere is this issue more pronounced than in an examination of Paul Rachubka’s chalkboard below.
For many, the return of Rachukba between the sticks was a welcome sight, following a string of error’s from Richard Kingson. However, while none of Everton’s five goals can be directly attributed to Rachubka, Holloway must be concerned with his distribution. The USA born goalkeeper managed to find a tangerine (or white, in this instance) shirt only four times out of 21 attempts in the first half – a woeful 19% completion rate. Also noticeable is Rachubka’s failure to play the short ball even once.
A key facet of Holloway’s system has been to play the ball out from the back, but by opting to go long so frequently, ‘Pool gave the ball away cheaply. In the second half Rachubka managed a more respectable 50% pass completion rate, but still opted to go long more often than not. Rachubka may be less accident prone than his Ghanaian counterpart, but unless Holloway can train his number 1 (in squad number terms) to make the angle for the short ball, he may quickly find himself back watching from the sidelines.
Blackpool suffered an early set-back almost immediately after the break, but thereafter enjoyed their best spell of the game. Elliot Grandin and Jason Puncheon began to combine well, with Blackpool’s counter-attacks testing, and overcoming, Everton’s defence. Holloway now has a variety of forward options and Puncheon impressed on his debut, getting into dangerous forward positions and causing problems with his pace.
At 3-2, the momentum was with Blackpool, but the scoreline presented Holloway with a dilemma. So often ‘Pool have forfeited winning positions, with different strategies all failing at various times. Against Man Utd, Holloway sought to continue to attack, throwing on both Matt Phillips and Marlon Harewood. As we all know, that strategy backfired as the team from Salford turned the game on its head with three quick goals. Holloway tried to emulate the win over Everton’s city rivals by packing the defence and midfield, but as Tangerine Dreaming points out, it resulted in handing Everton the advantage – Pool’s defence was at sixes and sevens despite their superior numbers.
It is a decision easy to criticise in hindsight, and one Holloway must surely regret. Positive changes, or even keeping things as they were could have seen ‘Pool return with at least a share of the points, if not all three, but ultimately defensive lapses have cost the Seasiders again. There are enough positive signs in Blackpool’s attacking ability to retain hope, but the failure to strengthen the defence despite Dekel Keinan’s departure could come back to haunt the Seasiders.
Louis Saha gave a masterclass in clinical finishing either side of Blackpool clinically punishing two mistakes made by Everton players. However, it was a double defensive substitution by Ian Holloway that failed to snuff out Everton’s attacks that swung the game back in David Moyes’ favour.
Setting Up
The opening play saw Holloway pitting his 4-3-3 against the 4-1-4-1 of David Moyes, who had Marouane Fellaini in the holding role in a system that had stifled Blackpool earlier in the season at Bloomfield Road. James Beattie started in the front three, alongside Jason Puncheon and DJ Campbell who dropped deep from the centre to receive the ball.
Moyes has watched Blackpool a lot this season and knows he needs to block the space with a holding midfielder and lined up 4-1-4-1 against Holloway's 4-3-3.
In effect there appeared to be three key dynamics that lead to Everton’s win which are discussed below.
Right back to where we started
Prior to this game starting Blackpool had conceded 16 goals in their last 5 games since beating Liverpool. 13 of them have germinated in the right back area as teams appear to have spotted and exploited a real weakness in the Blackpool defence.
This season Everton have been exceptional down their left hand side, so this match had the potent combination of Blackpool’s weakness matching up with Everton’s strength and this was key in this game with all 5 of Everton’s goals coming via this channel.
Taking Everton’s first goal step by step you can see how their defence is drawn out of shape by some simple Everton passing and movement.
Neil Eardley shows Bilyaletdinov plenty of space to turn and run.David Vaughan has to track the Everton runner who has exploited the space that Eardley leaves behind him.Eardley does recover his ground, but commits to the challenge and is beaten easily by Bilyaletdinov and the Blackpool defence has conceded 20 yards of space for him to attack.Blackpool's centre backs are unable to doing anything to stop the cut back cross ball.
Everton focused their passing down their left hand side and completed 60% of their passes in open play down the left hand side.
This blog recently discussed the importance of Blackpool’s full backs in their open sense of adventure, however, it appears that teams understand this to be as much of a weakness too. As the full backs attack they leave space behind and recently it appears the space isn’t being covered effectively. Should Blackpool stay in the Premier League then Holloway will have worked hard with his full backs to sustain their attacking potency whilst ensuring defensive stability.
Keeping it tight till switching it off
Without doubt Everton controlled the space on the pitch very effectively for the most part, however, after going 2-1 up the appeared to push for a third to kill the game off. In doing so they started to lose a little of their shape and Blackpool exploited this very well in transition and capitalised on mistakes.
As a result of Marouane Fellaini sitting in a 4-1-4-1 Blackpool were strangled and even on the rare occasion when Elliot Grandin was able to get goal side of Fellaini, he ended up not being able to find a team-mate.
Here you can see that Grandin has escaped Fellaini in a very rare first half occurrence, but fails to make it pay.
Fellaini closed out Charlie Adam effectively in the first half, even when he was in the deep. Look at the shot below as Fellaini makes up several yards to close Adam down which forces Adam in to an error and leads to Everton’s build up for their first goal.
Fellaini is aware of Adam dropping deep, sensing danger he steps out of position to close Adam down in the space marked by the red dot.Fellaini has closed out Adam and he hits a wayward pass handing possession to Everton who go on to score.
In fact Charlie Adam was stifled in the first half and had a pass completion of only 48%. As he was gradually afforded more space in the second half it increased to 67%. As further demonstration of how Everton disrupted Blackpool’s passing their completion was 64% in the first half and in the second it was 68%. It is interesting to note that for Blackpool’s period of goal scoring (between 61 and 65) it increased to 78%.
The Chalkboard below shows how Fellaini contested 11 duels and won 10 in the whole match, however, 8 of those were in the first half and he and won 7 of those as he dominated the midfield. As Fellaini stopped being dominant in his duels Blackpool enjoyed their success. Was this just a coincidence?
Fellaini had a great game in the tackle, however, in the second half as the game swung towards Blackpool he failed to win duels. As he started to win them again on the 73 minute mark Everton started to control again.
Concession of the advantage!
At 3-2 Blackpool appeared to have Everton exposed to the counter and it was at this point Holloway tried to change the dynamic, seemingly to shut the game out. In his post match interview he likened his move to the one made against Liverpool to shut out the result. However, the two moves were completely different, against Liverpool his switch came with 5 minutes remaining, whilst he had a full 20 minutes to control here. Also, he went to a 4-1-4-1 against Liverpool whilst against Everton he went to a very unfamiliar looking 5-4-1. In doing so, he conceded his small advantage in favour of asking Everton to try to break them down. Everton did, through a combination of defensive mistakes, dis-organisation and naivety. The shots below show how Blackpool struggled to organise themselves in to a coherent 5 man defence. Firstly, the centre backs are drawn narrow and inside the Everton attackers and secondly in the run up to the Everton fourth goal, as the third centre back (Rob Edwards) is out of position with Neil Eardley behind him.
Blackpool struggle to space their 3 centre backs allowing themselves to be drawn inside the Everton attackers leaving plenty of space either side of the three.From another angle Blackpool's defence is totally out of shape as Beckford puts Everton ahead.
As further evidence of how the defensive move didn’t pay off, see the chalkboard below and notice how Blackpool fail to win any duels as Everton pick off three unanswered goals.
Above, even when Blackpool went defensive, it never paid off, losing 1 tackles in a 10 minute period. Prior and before that they worked hard in the tackle even though they lost 24 of their 53 challenges.
Ding Dong
This was a battle launched firmly on a robust Everton side shutting out Blackpool’s attacking space, before stinging them down their flawed right hand area. However, after handing Blackpool space on the counter Ian Holloway will move on to the next game knowing that his team are still potent, and will hope to find a better way of controlling the game against Aston Villa should he find his team holding the advantage.
It had been billed in some quarters as a ‘must-win’ game, and while not quite that crucial, the home defeat to West Ham last night is a major set-back. With four straight defeats, three of those at Bloomfield Road, ‘Pool now find themselves unerringly close to the bottom three. A win would have seen the Seasiders go 10 points clear of West Ham, instead of the four point gap that now exists. It’s nothing to be ashamed of necessarily – after all some pundits would have had you believe ‘Pool would have been all but relegated by this point – but from what appeared to be building up to a comfortable mid-table finish, Ian Holloway’s men are now in a relegation fight.
There are a number of reasons for last night’s defeat, but an absence of luck probably isn’t one of them. Questionable team selection, poor individual performances and sloppy mistakes resulted in a first half as bad as any witnessed on the Fylde coast this season. Holloway made two changes from the team that tested Manchester United to the limit last week, the casualties being Elliot Grandin and Ian Evatt. David Carney and new signing Andy Reid were the beneficiaries, but the decision to drop Evatt, thus unsettling the defence, seemed to spectacularly backfire.
The return of Carney was to be expected, with Alex Baptiste the square peg in a round hole at left-back when the side from Old Trafford were the visitors. Evatt however has been a lynchpin of ‘Pool’s backline, and aside from being caught out at the Emirates has excelled despite the step-up to the Premier League. Rumours of off-field antics could explain Evatt being dropped, but it meant a defensive unit that looked like strangers. In addition to Reid not quite being a like-for-like replacement for Elliot Grandin (as highlighted by Tangerine Dreaming), Blackpool were unbalanced.
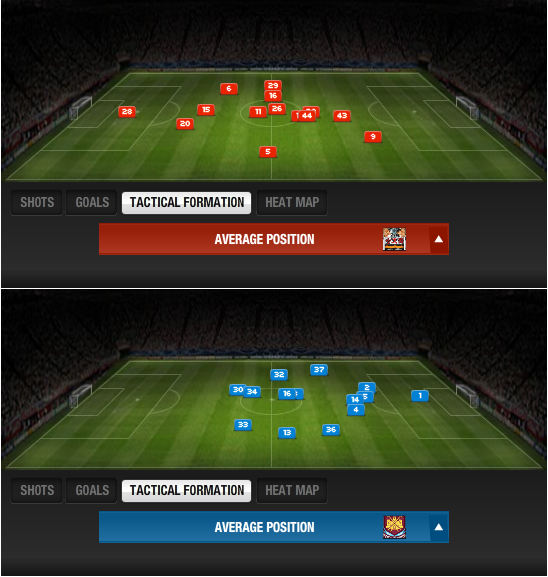
The diagrams below show the average positions of the Blackpool and West Ham players and display a stark contrast.
Where the Hammers set-up offers clarity, ostensibly a rigid 4-4-2, the average positions of the Blackpool players helps identify why the Seasiders struggled to match their opponents from East London. Neal Eardley (5) is horribly exposed, and would explain why Victor Obinna (33) gave him such a hard time. Eardley typically relies on support from Gary Taylor-Fletcher (12, hidden behind 44, Beattie) and the absent Grandin. On Wednesday night Taylor-Fletcher was often found drifting inside, while Reid (43) as a left-footer did not give the former Oldham right-back adequate protection.
The average position map also shows a severe lack of width to Blackpool’s attacking play. Luke Varney (16), whose form has worryingly nosedived in recent weeks (highlighted in my West Brom review), failed to get into his usual positions out wide high up the pitch with Carney (29) playing just as high up as his sound-alike teammate. Equally Taylor-Fletcher did not provide any sort of width on the right, nullifying ‘Pool’s usage of those famous long diagonals.
Referring again to Tangerine Dreaming, the Guardian chalkboard of Blackpool’s passes from open play highlight the lack of width to the Seasiders’ performance, with Tangerine Dreaming citing Carney’s lack of adventure in getting forward as another explanation. In terms of the formation and the roles of players filling in for regular members of the team, Holloway has some work to do on the training ground.
Despite the poor first half performance, ‘Pool did not throw in the towel and sought to take the game to West Ham after the break. Attacking changes were made on hour mark in the form of Marlon Harewood and a debut for James Beattie, replacing the tiring Reid and disappointing Varney. This naturally resulted in a more basic gameplan – Blackpool being more direct with big targetmen to aim for. In terms of sheer numbers, this saw ‘Pool have 12 shots to West Ham’s two, as shown by the diagram below.
Despite the quantity of shots, in terms of clear-cut chances ‘Pool had very few, rarely testing Rob Green in the West Ham goal. The closest the Seasiders came was Eardley’s free-kick, other chances being speculative shots from distance or goalmouth scrambles. For all Blackpool’s pressure, they lacked the creativity in the final third to break down a resolute West Ham defence. To witness just how well the Hammers defended, one need only look at the number of second half clearances made by Avram Grant’s side.
An incredible 26 successful clearances were made in the final 45 minutes, with a further 13 attempted. West Ham don’t do anything spectacular in terms of tactics, but Grant clearly had them well-drilled, which when combined with superb individual performances from the likes of Obinna, made them very effective. The Hammers were good value for their three points and few Blackpool fans would have gone home feeling hard done to.
Blackpool move onto Goodison Park on Saturday and Holloway will be eager to halt the slide. This result however is sure to give him a selection headache against Everton, and I for one wouldn’t care to predict what the starting line-up will be on Saturday. Changes do need to be made however, Varney and Richard Kingson two names that instantly spring to mind. Kingson’s errors are beginning to add up and are proving costly. As for Varney, he is vulnerable with the increase in attacking options at Holloway’s disposal. Another game coming around so quickly is possibly the best thing, as it shouldn’t allow the negativity following this defeat to linger. A positive result there would quickly dispel the nervousness that is beginning to creep in.
West Ham outworked Blackpool in the central area of the pitch to record a deserved victory as Ian Holloway shuffled his team selection which ultimately appeared to disrupt the fluency that they have found at many stages this season.
Setting up
4-3-3 v 4-4-2, West Ham’s Obinna being the player who drifted the most from either side.
This was a clear 4-3-3 v 4-4-2 battle and for the first time this season Blackpool were undone by a flat and very plain 4-4-2 with few defining features. There was two clear reasons for this.
1. Mark Noble and Scott Parker worked hard to deny Blackpool’s midfield enough space to operate and when they won the ball they were economical with it. The consequence of this was that Blackpool’s pass completion dropped to 71%. Between Noble and Parker they attempted 100 passes completing 77% compared to Vaughan and Adam who attempted 123 passes completing 69% of them.
2. When David Vaughan and Charlie Adam found space; Andy Reid was struggling early on to understand his role in a new team and was often too static. This appeared to be backed up as Ian Holloway appeared to have a lengthy discussion with him around the 20 minute mark. After about half an hour he was swapped with Gary Taylor-Fletcher. Assuming Reid was told to play a central winger role as defined by Zonal Marking the other month, then by looking at the chalkboard below you can see how Reid stayed in central area more opposed to the way that Grandin drifted to the flanks in the previous game against Man Utd. Added to this Reid misplaced 8 of his 19 passes in open play.
Assuming both Reid and Grandin are assigned the same role then you can see the difference from the opening 30 mins of the last two games. Reid appears to stick in middle as Grandin drifts to the wing.
A final point on Blackpool’s formation, as is becoming normal when chasing a game, Blackpool moved more in to a 4-2-4 as Holloway made his usual aggressive substitutions.
Back line changes
Ian Holloway made his first call of the night by picking a defensive line that had never played together before. David Carney came back from the Asian Cup Final (where he went for a jog instead of marking Tadanari Lee, who scored the winning goal) and in to the left back spot with Alex Baptiste moving in to centre back as Ian Evatt was dropped to the bench. The back line didn’t settle and Holloway brought on Evatt on at the break to replace Craig Cathcart. The impact of these changes saw Carney sit back more than Stephen Crainey would have done, whilst West Ham (as previous clubs have done) appeared to target an apparent weakness in Blackpool’s right back area.
In previous games both Sunderland and Manchester United have opened up Blackpool down their right side, this isn’t to say that it’s the right back who is causing the issue as the right-sided centre back has a duty of cover as well. It appears that there is a lack of cohesion at times down that flank and West Ham were the latest side to benefit. What causes this appears to be three things. Firstly, the right back (Eardley in this case) misses tackles. Secondly the right back loses position and doesn’t recover quick enough. Finally, the centre back not anticipating danger and being able to cover adequately enough.
With Carney not having the sense of adventure that Crainey brings to the team it appeared to reduce Blackpool’s attacking dynamic down the left and Blackpool enjoyed more success from the right flank. You can see from the Chalkboard below where Blackpool lacked some balance in their passing.
Blackpool struggled all game to get in to good positions in the final third. Here you can see how few passes were completed in the final third on the left flank. Possibly Carney lacked the adventure that Crainey brings??
Moving on
Mistakes were all too common for Blackpool in this match, but West Ham showed up like a team who are used to working hard to battle against relegation and duly got their reward along with a mercurial performance from Victor Obinna. Ian Holloway will have a think about his strategy for integrating his new players in to his side and work hard towards an invigorated Blackpool performance to push Everton all the way this Saturday.
Steve Bruce lost Darren Bent to Aston Villa this week and Daniel Welbeck to injury, but arguably it helped to define his team selection and he reaped the benefits. Ian Holloway will be happy with the way the game ended, but will be hoping that injuries picked up don’t affect his side over the coming games.
Setting up
Sunderland made space hard to come by in the middle of the pitch, Malbranque sitting narrow and out of possession Richardson dropped back in to midfield.
From a formation point of view Blackpool set out in their normal 4-3-3, but Sunderland resembled more of a 4-5-1 out of possession with Kieran Richardson breaking from midfield when in possession of the ball to join Asamoah Gyan up front. Out of possession Sunderland were narrow in midfield, little width was used as Steed Malbranque edged in from the left. In losing Darren Bent this week Steve Bruce was forced in to setting up this way, arguably had he had the same squad at his disposal as the last time these two sides met then he’d possibly have gone 4-4-2 and potentially given control of the centre to Blackpool.
The simple way to effectiveness
Sunderland came with a simple and clear game plan;
Crowd the midfield
Press Blackpool high up the pitch
Attack quick and direct when in possession
It is often the simplest plans that draw the most success and Sunderland carried out theirs to perfection. Each player worked hard to hassle Blackpool players in possession of the ball and in particular this served two purposes. To break up Blackpool’s passing rhythm in midfield and to stop Blackpool playing out from the back. As can be seen below, Zenden and Henderson were told to press Blackpool when they were in possession of the ball in the deep. Often this is where Blackpool build their attacks from, not this time, as Adam and other Blackpool players were given little space to work in early on in the game.
Three Sunderland players ensuring that Blackpool couldn't pass it out from the back. This pressure was applied directly after keeper distribution.Here you can see that Blackpool are suffocated on the edge of their box. Adam has no space to move in to or many passing options.Adam has the ball, but two on rushing Sunderland players are making sure he can't find any space to make a play.
The work that Sunderland did in closing down the space pushed Blackpool’s normally reliable passing down to a completion rate of 71%. Sunderland did see less of the ball, but as with any possession in football, it is what you do with it that counts, their pass completion came in at 63%.
The strongest survive
Sunderland are an athletic and strong team and certainly some strong challenges affected Blackpool and their plans for the day. A boot to the nose of Neil Eardley meant he was off the pitch when they scored and an injury to Richard Kingson meant a substitution had to be used to bring on Paul Rachubka. Added to this Stephen Crainey went of with what appeared to be a twisted knee. You can see below how Sunderland instinctively attacked the space left by Eardley being off the pitch. If anything Craig Cathcart (20) perhaps should have checked his position as he is very close to Ian Evatt here and has been sucked in to going where the ball is.
Arguably, had Eardley been on the pitch then he'd assume the position indicated by the tangerine line and Richardson wouldn't have had anywhere to run in to.
Shining Lights
This doesn’t detract from the excellent game Sunderland played and in particular Jordan Henderson stood out, assisting in breaking up Blackpool’s midfield winning all 4 of his duels, making two interceptions and spreading the play when he had the ball as well as making intelligent untracked runs in to the wide right position (first half) to deliver some quality crosses. Also Bolo Zenden was excellent in breaking up play in the centre of midfield winning 7 out of 8 of his duels.
Exploitation
Blackpool did get to grips with Sunderland at times in the first half and once their realised that Sunderland were over committing men in the press, they then exploited the space. However, Craig Gordon had a superb game and once the game went 2-0 Sunderland were happy to drop deeper and ride out whatever Blackpool could throw at them in the hope of catching Blackpool on the counter. Below you can see what happened when Blackpool chipped the ball over the Sunderland midfield. It left Charlie Adam with a full 30 yards to run in to exposing their back line. Only good keeping from Craig Gordon stopped this from being 1-1.
All the Sunderland midfield have committed to attack and press in the final third. A simple 'out ball' leaves Adam with a free run to the back line.
Lack of frontal cohesive movement
Blackpool lacked the focal point of DJ Campbell, often the player that will drop deeper and work hard to win ball as well as making intelligent runs. Gary Taylor-Fletcher didn’t offer the same movement and mobility upfront as Campbell, he doesn’t make forward runs or peel off the shoulder of defenders, he likes to drop to receive the ball before giving and going. This meant that Charlie Adam had little to aim for by way of runners in to the channels or in behind the defence.
Matty Phillips offered some dynamic runs from wider positions, but more often than not he failed to beat his man losing 4 out of 5 take ons. Added to this Luke Varney was very static at times and when he did manage to cut in he failed to make a positive contribution, losing all eight of his duels. In the final third Varney came up short with only 3 of his passes being successful in that area and two of those were out wide and went backwards. Blackpool found it hard to penetrate the Sunderland defence when running with the ball. Look at the Chalkboard to show how attacks around the box broke down as Blackpool lost the take on. Virtually the only time they did break the line, they won a penalty.
Blackpool trying to take Sunderland players on a losing 17 times, look how many are in the final third.
Moving On
Ian Holloway will hope that his team learn from this display and find their rhythm early against Manchester United on Tuesday night as a strong performance could help to set up this next stretch of games where Blackpool will hope to nudge closer to safety. He’ll also hope that the injuries sustained today, don’t have any major impact on his squad. Steve Bruce will be happy that he won and won via a simple and effective game plan.
Simon says, 'put your hands on your head if you can land it on a sixpence from 50 yards'.
There’s no doubt that when people refer to Blackpool this season they normally mention Charlie Adam in the same breath. He has adapted to life in the Premier League and made many people sit up and take notice. However, where does Adam fit in the Blackpool FC and just was does he bring to the team?
Tale of the tape
Keeping things brief on this front as the table below will cover most of the key stats, but far and away the first stat to catch the eye is Adam’s passing. Blackpool as a team have a pass completion of 75% and Adam has a lower one than the team coming in at 71%. However, given that Adam is the main set piece taker then the open play pass completion percentage may hold more relevance to his overall play. In open play he finds his team mates 74% of the time against a team average of 78%. Again he comes in lower than the team average, but assuming Holloway has assigned him the role of playmaker then he is likely to mis-place passes as he looks for the killer ball.
What is clear when looking at his stats for the season is how much he contributes elsewhere and this is typical of the player he is and the flexibility that Holloway has instilled in the team. There’s no room in the Blackpool squad for one-dimensional footballers (and arguably no place for them any more in the modern game) and he chips in winning tackles (83) and intercepting opposition moves (41) which are duties normally associated with a more defensive minded midfielder.
Extracted from Guardian chalkboards and Telegraph stats.
When you look at the table above there is one of those numbers that start to show the true worth of Adam to Blackpool this season. That is the key passes totalling 36, the next highest Blackpool player is Gary Taylor-Fletcher with 27 and ranks Adam 13th in the Premier League. What this does is to back up the assertion that Georgina Turner made in her excellent article about Adam in that, ‘he has set countless Blackpool moves in motion with a well-timed drop of the shoulder and a deft flick of his left foot’.
Positional focus
Now the stats have been laid bare, what about the space that he occupies on the pitch. All those stats occur for a reason and that is they happen within that space and to understand that space can help to understand some of the variation in success that Adam has had this season. By no means has Adam been perfect and with his work rate comes a desire to improve and success. He’d possibly be first to admit that there are times this season where he has failed to break defences down or command more authority in the middle of the pitch.
These following four games give good examples of where Adam operates best from Blackpool’s perspective and where the opposition are best to keep him in order to keep him quiet.
Liverpool
In the first game against Liverpool this season, Adam was at the heart of a magnificent performance from Blackpool underpinning some wonderfully positive passing moves. On the day Liverpool were very static in the first half and Blackpool worked between their lines with ease. In midfield Liverpool tended to allow Adam as much space as he wanted. Whether this was ignorance from Roy Hodgson or not isn’t clear, but it happened. As you can see below Adam spread himself far and wide and made it in the Liverpool box at times. He got forward well and found space in the final third in order to operate.
Above Blackpool are attacking right to left.
When Liverpool came to Bloomfield Road the other week it appeared that Liverpool (albeit under new management) still hadn’t come to terms with Adam endeavouring to find space. They coped with him better and as mentioned in the review they did field a similar three-man midfield to Blackpool. However, with Christian Poulsen proving to be rather inert Adam was still able to find space and time to find his passing range. Below you can see that he is still allowed to get in the box and the final third even given the different Liverpool approach.
Above Blackpool attacking from left to right.
The Liverpool matches in isolation may not show the positions where Adam is dangerous, but given he was at the heart of both victories a look at another match set might show where to keep him.
Manchester City
The home game against Man City saw Adam earn rave reviews from Sky Sports pundits (not sure what qualification that is?) but it saw Blackpool go down to a 3-2 defeat. Ultimately the game was highly influenced by the majestic David Silva ghosting around the pitch and cutting deeply through the Blackpool defence with his vision and passing ability. However, it appears that City were all too aware of letting Adam get free and in to space and close to goal. Aware of his passing ability and propensity to shoot on sight you can see below how his heat map is considerably more constricted than that of the Liverpool games. There is little activity in the final third as Man City were content to let Adam have the ball in deeper areas.
Above Blackpool attacking from left to right.
In the return at Eastlands it appeared that Man City had the measure of Adam. Keep him deep and he is less of a threat. However, it is important to note that Roberto Mancini has an emphasis on a holding midfielder and in this match Nigel de Jong was excellent in killing the space that Adam likes to attack and something akin to what Poulsen should have done for Liverpool at Bloomfield. You can see below just how little of the final third Adam was seeing in that match.
Above Blackpool attacking from right to left.
This is most probably nothing new for most people, but hopefully it shows that given space, time and less attention then Adam can advance in to his favourite areas and should that happen then it becomes more likely he’ll hurt teams. In the away match against Stoke he worked between Stoke’s rather static 4-4-2, found space and again was central to all the good things that happened for Blackpool that day. Contrast his heat map below to that from the Man City game above. You can clear see how much more he gets in the final third and on that day was key to the DJ Campbell winning goal.
Above Blackpool attacking from right to left.
It’s pretty clear and logical that the closer teams allow Adam to get to their goal with time on the ball the more threatening he is and given that Blackpool tend to struggle against teams covering the space in front of defence with a holding midfielder suggest that might be the way to stifle him. However, given his passing range from deep and Adam’s desire to develop, then it wouldn’t be surprising to see him adjust his game to become a threat from the deep.
Just to illustrate one final time, look at the chalkboards below, one from the Stoke game and one from the Man City (away) game.
Adam opens up the Stoke defence who lined up in a flat 4-4-2 affording him space. Compare that to the lower one where Man City closed out the space that Adam thrives in.
What’s not in the stats?
Following on from that his passing range is something that cannot be unlocked through the stats above. His range is superb and a look at Up the ‘Pool’s recent article on the long diagonal pass goes someway to illustrate his range of passing. However, added to that range is his speed of thought, passes of long or short-range aren’t ‘eyed’ up or pondered over. They are swiftly clipped with either inside or outside of the boot giving little or no advance warning to the opposition as to where the ball will end up. The downside of this is that his team mates aren’t often able to judge and should he step up to a more high-profile team then perhaps players of a supposed higher standard might read him at the same speed as he makes his mind up.
Added to this there are the unquantifiable aspects of his character that bristle when he takes to the pitch. He has a free spirit on the turf allied to a steely drive and determination that emanates in strong attacking runs or fully committed tackles.
Three is the magic number
On this blog the ideas and theories behind Blackpool’s three-man midfield have been discussed in length and this is crucial to understanding Adam. Adam must be considered in terms of Blackpool and the system that they play, he is surrounded by hard-working and equally excellent players who provide him with the ball and receive his passes and finish off the team moves.
Adam’s performances are facilitated by those around him and none more so that David Vaughan. Before looking deeper at Vaughan a mention needs to go out to the role that Elliot Grandin plays in freeing up space for Adam to attack. Earlier in the season it wasn’t entirely clear what role Holloway wanted him to play, however, as the season has progressed it appears that Grandin has a brief to drift to the flanks, initially looking composed on the ball, but its the space he leaves behind which is key. By drifting to the flanks he leaves a vacancy behind that Adam can fill.
David Vaughan was brought to the club as a left back, left winger before Ian Holloway arrived and when it became clear that Holloway had secured the signing of Adam it appears that Holloway had done his study on the best way to get the most out of Adam. Adam signed on loan in the February of 2009 under Tony Parkes. Adam fizzed and dazzled in fits and starts during his 13 match loan spell, earning a red card on debut for a clash with former Bloomfield favourite Richie Wellens in a match against Doncaster. What this loan spell tended to show is that in a two man midfield Adam could be dominated by hard working opponents, Blackpool won 4 games of that 13 game spell. What Holloway knew was that to get the best of Adam and free him up he had to field him in a three man midfield. It’s a bit chicken and egg whether or not Adam inspired the 4-3-3 or Holloway was going to play that way anyway. The man Holloway appears to have assigned as the man to free Adam up was David Vaughan. Keith Southern was in there, but he is full of energy and bustle and not nearly so composed on the ball. Holloway knew he had to have a passer of the ball in next to Adam in combination with the energy of Southern. The midfield this season have evolved further and become more cultured, but the role of Vaughan has changed as well. He sits more, he breaks the play up, he is both breaker up of opposition play and setter of tempo.
Look at Vaughan’s stats below to see what he contributes to the team.
Extracted from Guardian chalkboards.
What the stats show is that Vaughan averages about 10 passes per game less than Adam, but is more efficient with his passing, achieving 87% with his pass completion. This is measurable against other players who are playing in a slightly withdrawn role i.e. Chelsea’s Jon Obi Mikel has clocked up a pass completion of 89%. Also, he also won 82 tackles at a success rate of 66% which helps to break up opposition play. Vaughan will also retain possession and allow Adam to move in to space. Vaughan is however, more static in movement given his role, but will set the tempo with passes to full back and centre backs before releasing to Adam.
Hopefully what has been illustrated here is that although Adam is getting a lot of column inches David Vaughan is integral to that and he must be viewed in tandem with Adam. He shoots less and holds a lower profile, but teams who ignore Vaughan will leave themselves open to Blackpool dominance in the pass.
Improvements
Ian Holloway recently said that he’s working to ensure that Adam got a move to one of the country’s biggest clubs if he stuck with him for the rest of this season. The reason behind this is that Holloway feels Adam can still improve under him and by looking at his stats you can begin to see where he may look to improve him. First and foremost, his decision making could be refined, instead of looking for the killer ball, the simple lay off might be an option. Given his pass completion is lower than the team’s average and some way below that of Vaughan and other recognised ‘top’ Premier League midfielders (Paul Scholes weighs in with a pass completion of 90% and David Silva 83%) then he may strive to improve his decision making, rather than his passing ability. This would surely have a positive effect on Blackpool retaining possession more often.
Added to this Adam loses more duels when taking on opposition players and again this might be something that he can work on, either to do so less or improve his ability to get past players. Given that on 28 occasions he loses out then that could be 28 passes to a team mate or any other positive option.
Another statistic that Holloway may try to reduce is the number of shots that Adam has, again choosing the right time to shoot may improve his all round game. At the moment he has had 66 shots at goal, 15 finding their target and 3 hitting the back of the net, from penalties. Again, any improvement here will only serve Blackpool well and assist in them retaining Premier League status for another year.
The King of Bloomfield Road??
It’s very likely that Charlie Adam will leave Bloomfield Road, but he will leave all Blackpool fans with memories to savour and linger for generations to come none more so than ‘that free kick’ at Wembley last May. Provided any future move is conducted with dignity and respect and the club get a respectable transfer fee then it will suit everyone. Adam will get his chance to shine on an even bigger stage and Blackpool will live on and stronger for having Adam grace the turf at Bloomfield.
By now everyone knows how this match panned out. Both sides made errors that were punished and West Brom claimed the 3 points. However, what went on from a formation point of view and how did that affect the match as the 90 minutes unfolded?
Setting up
Roberto Di Matteo uses a 4-1-4-1 which sometimes evolves into a 4-3-3 depending on the progressive approach of Jerome Thomas and Chris Brunt, whereas Ian Holloway favours his variant 4-3-3 that evolves in to a 4-2-3-1 or sometimes a 4-2-1-3.
First Half Hour
Blackpool with a deep defensive line, a tight and narrow midfield.
Blackpool lead after 30 mins and as you can see above, the defensive line is sitting deep and the team in midfield are bunched close together closing out the space affording to the West Brom midfield. Whilst below you can see how West Brom played marginally higher up the pitch and resembled something more like a flat 4-4-2.
WBA looking like a flat-ish 4-4-2 as Blackpool find space between their lines and create chances.
Drawing Level – 40 mins
Blackpool starting to spread and Vaughan being left behind as midfield moves up.
As West Brom drew level Blackpool’s formation had started to spread wider than before and Taylor-Fletcher (number 12) has dropped back in to midfield. On the other hand West Brom have got marginally more adventurous with Marek Cech (4) pushing higher up. However, in midfield Youssuf Mulumbu (21) has started to move deeper and Chris Brunt has moved inside more, presumably to assist his colleagues in midfield.
11 sitting in narrow to add to midfield as 14 begins to stretch the play and 21 starts to drift deeper as a 4-1-3-2 emerges.
Half time deadlock
Blackpool formed compact, but again with a gap between defence and midfield.
At half time Blackpool are the more compact of the two team whilst West Brom have their defence playing slightly higher and the whole team almost spread box to box. The compact nature of Blackpool’s formation might be a reflection of the fact that after initially having some joy in the game, they started to soak up some pressure and reverted to using the counter attack to break down West Brom.
WBA stretched almost box to box, but leaving space between midfield and defence.
On the hour
Blackpool at this point had fallen behind and Matty Phillips (23) had been introduced for Elliot Grandin (14). Given that Grandin was the further player forward when he departed might have been a reason for his withdrawal from the game as well as his fitness level. Perhaps he was instructed to push higher up, but you’d have expected DJ Campbell to have been in his position. Perhaps DJ was dropping too deep at times? Below West Brom are starting to look more consistent as Mulumbu forms a line with his full backs, he sits as the rest of the team progress. Di Matteo has a clear definition of his team, 5 players with defensive duties and 5 with attacking duties which strikes a good balance on the pitch.
WBA start to have a nice separation between defence and attack as Mulumbu sits to cover his defence.
Getting back on level terms
By this point Ian Holloway had gone searching for the game and made brave attacking substitutions. David Vaughan (11) started to drop deep to afford the side some cover, Charlie Adam (26) now standing alone in midfield as DJ Campbell (39) and Taylor-Fletcher start to advance forward in search of the goal. Below West Brom are very orderly, which was important in the scheme of things as they haven’t necessarily been drawn in to Ian Holloway’s plan to throw attackers on the pitch to open the game up. Their defensive 5 have barely moved in all the second half.
Last Gasp
More of the same as Blackpool advance forward playing their attacking football, however, what is interesting to note between this shot and the opening shot on 31 mins is the defensive line. Check back and notice how Craig Cathcart (20) and Ian Evatt (6) are higher up the pitch. Look at the half time positions and see how Cathcart was on the ‘D’ of the penalty box. Would Cathcart have been caught out by Scharner’s clog had he been sitting deeper as earlier? Below West Brom remain steadfast in defence whilst all around them is attacking chaos. The key here is Mulumbu again, who has maintained his positional discipline since his opening half hour digression.
Closing out and signing off
Yes this was a great game for entertainment, Ian Holloway certainly did everything he could to win this. Blackpool did superbly to get back on level terms, but after making attacking substitutions it is hard to try to alter a teams mentality so late in the game. West Brom kept tight and kept their shape and saw off the best that Blackpool could throw at them and fittingly Peter Odemwingie kept his composure to close out the match.
Blackpool went into this game hot on the heels of Wednesday night’s memorable victory over Liverpool, but could not overcome a West Brom side in a rut of five consecutive defeats. The two promoted sides produced a thoroughly entertaining game of football, which could easily have seen the number of goals run into double figures. It was by no means a masterclass in defending, but the neutrals will certainly have gone away happy. As for the Seasiders, this was a case of costly errors at both ends which ultimately resulted in leaving the Hawthorns empty-handed.
Arguably the main culprit was DJ Campbell, who going into this match had been in sparkling form with five goals in his last five league outings. Crucial chances were missed at the start of both halves, with Campbell also spurning an opportunity for a late equaliser, with the resulting melee in the box going agonisingly wide. The chalkboard below highlights Campbell’s shots during the game.
It is extremely uncommon for Campbell to squander so many chances inside the 18 yard box. This excellent piece from Tangerine Dreaming showed how all of Campbell’s goals last season in the Championship were scored from inside the area. Until recently, Campbell had not been afforded the luxury of chances from such close range, his first two Premier League goals coming from outside the box – against Newcastle and Aston Villa.
However, Campbell’s rich vein of form had seen him presented with opportunities in his typical scoring areas, many of which he duly grabbed. His goals against Stoke, Sunderland, Birmingham and Liverpool had all been scored from close quarters, and he will be disappointed not to have added to his tally on Saturday.
Could it be, however, that too much pressure had been brought to bear on Campbell? Before the match against Liverpool, the Seasiders had gone four league games with only Campbell getting on the scoresheet. Gary Taylor-Fletcher finally chipped in with an important equaliser and then followed this up with another equaliser at West Brom. The goals appeared to have dried up from Luke Varney though, and his performances too have not quite lived up to the standard he had set. To compare, see the chalkboard below of his passes in the fixtures against the Baggies and their Black Country rivals, Wolves.
Varney did admittedly only play 77 minutes at the Hawthorns, not the full 90 he did against Wolves, but even taking this into account the difference is significant. It is a pattern that is prevalent in many recent ‘Pool fixtures, and one not completely passing Holloway by as evidenced by his decision to substitute him in the last couple of games. Varney only made seven successful passes against West Brom, and only one in the second half before his eventual withdrawal.
When Varney is taken off, it is typically Brett Ormerod who assumes his role on the left of the front three, but it is widely accepted now that Ormerod’s impact is unfortunately not what it once was. If proof were needed that reinforcements are required in the transfer window, this is surely it. This is not to cast Varney aside, but merely highlights that when he is not performing, or needs a rest, there is nobody at the moment who can satisfactorily replace him. The potential arrival of Adam Hammill would provide much needed competition in this area.
I’ve chosen not to focus on the defensive performance, if only for the fact this blog post would be far too long. Needless to say, a few players had an off day, but when the back four have been performing so well all season, the odd poor performance can be excused. Craig Cathcart had barely put a foot wrong all season until Saturday, while Neal Eardley has been a revelation at right back. Knee-jerk reactions to these defensive lapses are unnecessary, and I don’t expect Ian Holloway will react with the same hysteria that some sections of the ‘Pool messageboards have. Blackpool now have a week until the next game, allowing Holloway to rest his players ahead of three consecutive home games. Four or more points from those will see ‘Pool bounce back in style.
Blackpool beat a sluggish, negative and stagnant Liverpool at Anfield back in October and with the return of Kenny Dalglish to the Liverpool hot seat, this match could’ve got away from Blackpool as Fernando Torres scored an early opener. It was a credit to Blackpool as they never panicked or broke from their game plan to get back in to the match.
The set up
Blackpool they lined up in their 4-2-3-1 with what could be described as their first choice eleven, although Elliot Grandin did sit a little deeper than usual at times making a flatter three in midfield. Whilst Dalglish picked a team who set up in a similar fashion to Blackpool, but had Glen Johnson in at left back after he was tipped for a midfield start.
For Blackpool Elliot Grandin played slightly deeper than usual whilst Poulsen sat in front of the Liverpool back four.
The effects of the formations made space very tight in the midfield with Raul Meireles playing in the three behind Torres with Lucas and Christian Poulsen holding deeper. If anything this restricted Blackpool, who at times this season have really struggled against teams who sit a midfielder deep and in front of the back four. A consequence of the midfield set up was that Meireles sat very close to Charlie Adam. At times it appeared that he was almost man marking Adam but it was more likely a consequence of positioning than anything else.
For arguments sake Liverpool’s formation at times could be described as a 4-1-4-1 as much as a 4-2-3-1, as Lucas tended to push higher up. As all the midfielders tried to find space they tended to shuffle with Meireles dropping deeper at times, Adam the same, Vaughan stepping up and Lucas the same. The only midfielder who failed to progress from his position was Poulsen, presumably under instruction. This meant that Blackpool could outnumber Lucas and Meireles in the centre as Grandin dropped deeper and Poulsen was out of the game.
At times Martin Kelly got forward from right back for Liverpool as did Glen Johnson on the left. Blackpool as usual pushed both full backs up when the times were right, but not in as sustained manner as in other matches this season. Both centre forwards worked hard, Torres in particular moved to close down both centre backs when out of possession and when breaking forward he was peeling off to the right and left to escape the centre backs.
First Hour
The game was very even for the first hour, as above, the space was restricted, mistakes were plenty in terms of conceding possession. Chances (goals apart) weren’t clean-cut. However, both sides were trying to pass the ball from the back, Blackpool moving it quicker on occasion in an attempt to either get Luke Varney winning headers against Martin Kelly or to catch Liverpool’s back four flat-footed.
Passing fad
Liverpool had more of the pass, with a pass total of 517 to Blackpool’s 445 with a completion rate of 73% to Blackpool’s 72%. However, as the game progressed Liverpool’s pass completion dropped off with the last 15 minutes of the game seeing it drop as low as 62% whilst Blackpool’s hit 72%. The chart below shows how, as the match progressed Liverpool’s passing disintegrated.
The pass comp % for both teams has been broken down in to 15 minute segments. You can see how as the match progressed from left to right then Liverpool's passing got worse.
Another observation about Liverpool was that their game against Blackburn Liverpool saw them make 598 passes at a completion rate of 74%, however, their passing lacked balance with 64% of their passes coming down the right. In this game they had much better balance with a 49/51 split between left and right.
Pressing matter
Points that stood out for Liverpool was their pressing of the ball higher up the pitch. This is illustrated in the chalkboard below as Liverpool won 65% of their 17 interceptions in the Blackpool half.
Liverpool pressing high up the pitch intercepting Blackpool's passes in their half.
However, very few occurred in front of the Liverpool area and it was this that exposed Liverpool’s back line. Poulsen was presumably asked to sit, screen and break up Blackpool play that threatened the Liverpool defence. However, all his interceptions occurred in the Blackpool half and none in that key area. It wasn’t as though Blackpool were bypassing that zone either, as you can see from the Chalkboard below. Blackpool consistently took on and beat Liverpool players in front of the back line. Poulsen won only 1 of his 5 tackles and effectively offered little or no cover to his defence. With Poulsen being so inert and positioned away from the heart of the action and Meireles being tied up with Adam, this left Lucas having to do the majority of the midfield work attempting 14 tackles winning 10 of them.
Blackpool taking Liverpool players on and beating them.
Parting to the end
In the 77th minute something occurred which was symptomatic of how Liverpool broke down towards the end of the game. With the ball on the back line and Blackpool pressing higher up the pitch, Poulsen dropped to receive the ball, however, Lucas and Meireles were caught too far up the pitch and any attempt to build from the back failed as the ball dropped back to Daniel Agger, he had little choice but to clear long and concede possession. Quite simply, Liverpool started to lose their shape (tiredness?) and never regained it again.
Here, Poulsen (yellow) is about to receive the ball from Agger (black) both under pressure from Taylor-Fletcher (tangerine) and Vaughan (white). There isn't another Liverpool player in the shot ahead of Poulsen. They opted to go long.
Subbing to stifle
Ian Holloway has at times this season tried to ‘shut up shop’ with mixed results, sometimes conceding late goals. In this game, it could be argued that the substitutions were crucial in this match. For Blackpool the injection of Matthew Phillips’ pace forced Liverpool deep and allowed quick counters for Blackpool. Added to this Ian Holloway brought in two defensive midfield subs in order to close out the game with fresh legs and an emphasis on the tackle. Blackpool’s shape changed to a 4-1-4-1 for the last five minutes whilst Liverpool’s changes made them resemble more of a 4-4-2.
Ian Holloway made defensive subs switching to a 4-1-4-1 for the last 5 mins.
It was the Liverpool subs who saw very little of the game who made the least impact. Jonjo Shelvey and David N’gog made a total of 7 passes (3 misplaced) between them, lost 2 of their 3 tackles and didn’t muster a shot. Whereas Alex Baptiste and Keith Southern got on the ball making 11 passes (1 misplaced), won 2 tackles and 2 clearances to ensure that the game end was controlled by Blackpool.
At the double
It was a high tempo, all action performance from Blackpool again and the fresh legs the Tangerines had will have given them an edge against a Liverpool side that tired as the match progressed. It was even more impressive, given that Holloway managed to stifle the game through good substitutions and that Blackpool got a win against a side playing a four band system, something they’ve struggled with this season. Again, the team keeps developing, at this rate, Premier League survival may be a strong reality.


 Formations")


 Formations")


